Sunday 31 August 2014

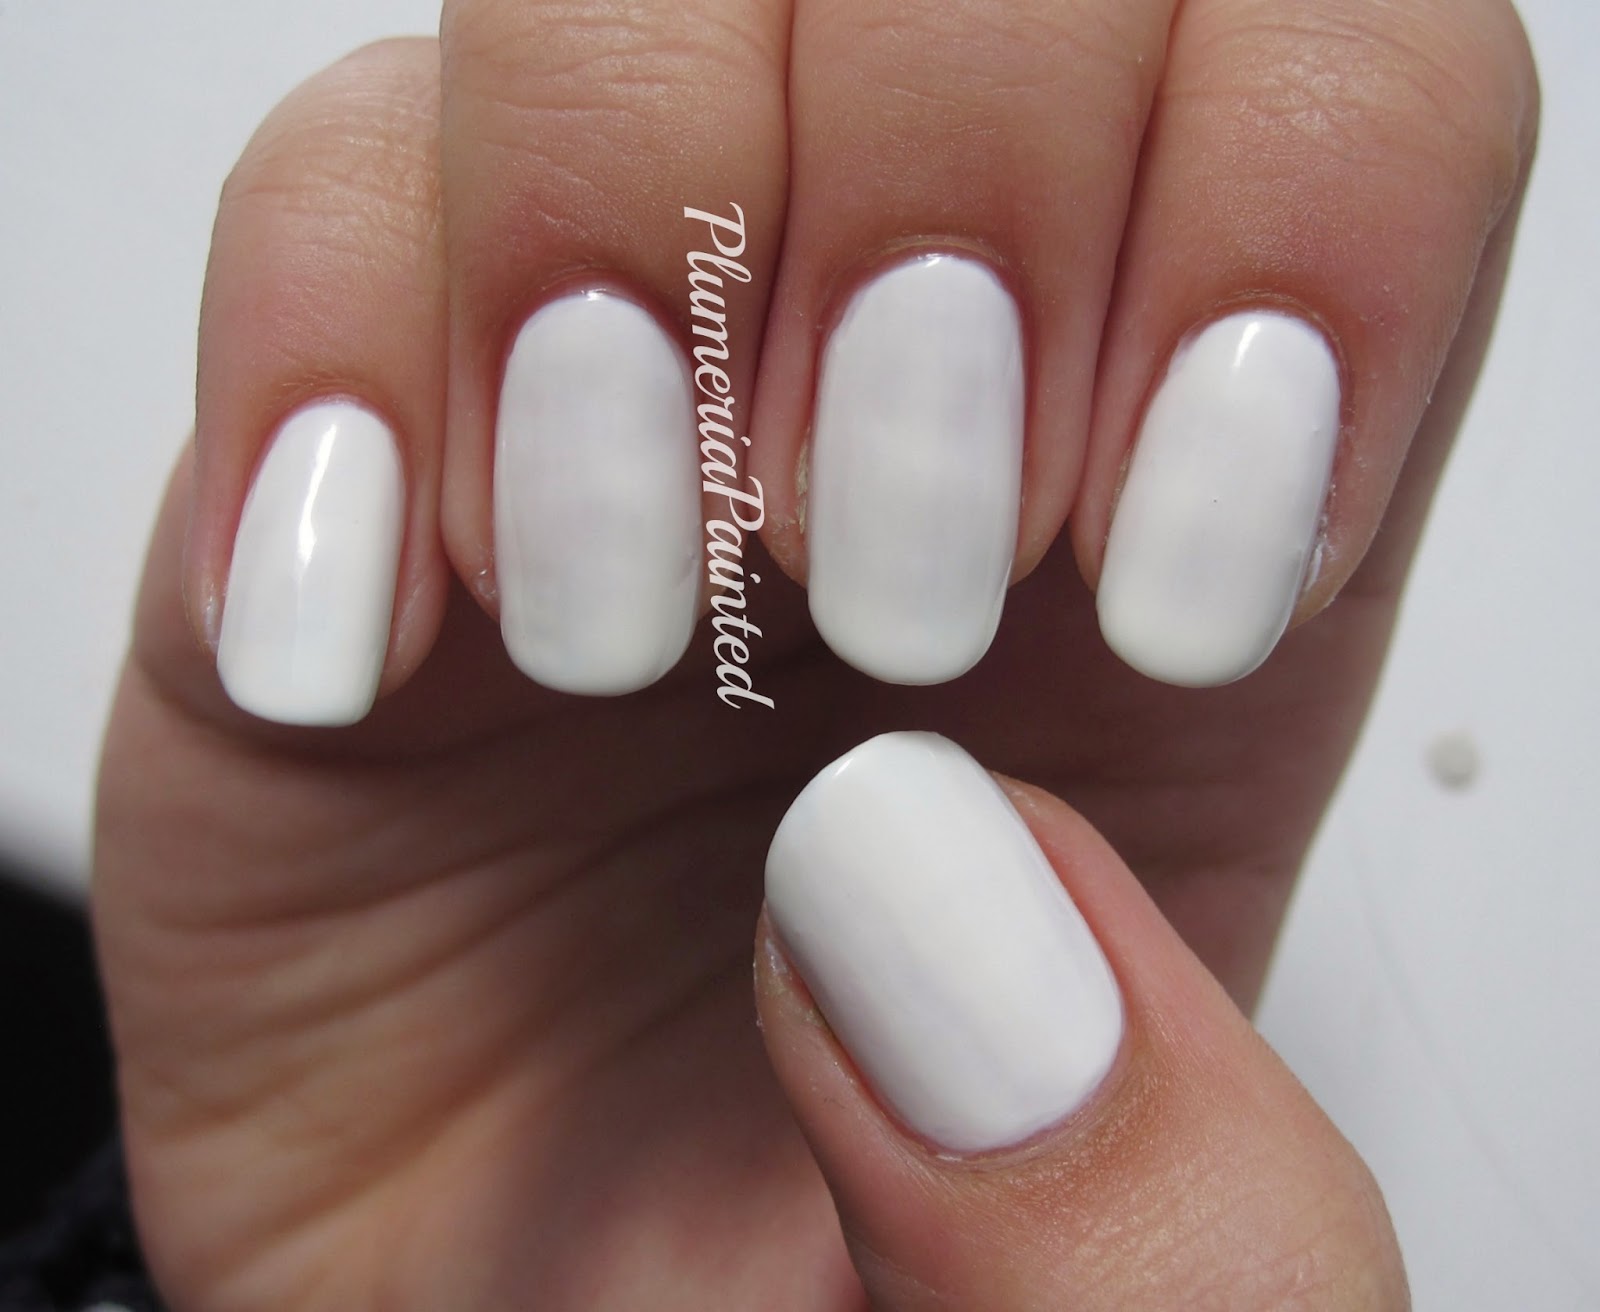
White Nails: No.7 - Snowflake

Hello, white polish today. I think white polish reviews have to be done. There's not the most exciting polish colour (well to me at least) but it's essential. As a nail art person, white polish is absolutely must-have whether it's for the base or the painting; there's always something that has to be painted with white. Though Snowflake isn't really a nail art polish, a review is still essential (let's pretend ok)!!

Ok so Snowflake is a white jelly. Snowflake is different because it's a jelly. But that's about it. I'm not gonna talk about shades of white cause that'll be too interesting for everybody (and I don't know much about shades of white).

This is my final No.7 polish to show, it's a shame that this brand is so underground cause the polishes are genuinely brilliant. I know I say I'll get more then I don't but again I'm very selective with my polish purchases. But maybe I'll have more No.7 to show you one day. Also I like the name Snowflake.

The formula of this is actually really good and I didn't even realise. Normally with jelly polishes the moment it gets on mah nails it bubbles. Like crazy. I thought this was all my fault but I did thicker coats than I was meant to, as usual. I didn't wait very long between coats, as usual. But no bubbles!!
Since jellies are a bit sheerer than cremes I used 3 coats (which isn't bad at all) and while it's not completely opaque, it's pretty good. It also applied completely smoothly and easily, I'm thinking of making this my new white base. I've had this for YEARS but it's not gloopy at all!! And of course Snowflake is brilliant for jelly sandwiches.

Thank you for reading and I hope you have a really nice day!! :)
Saturday 30 August 2014

The totally doable I have a life challenge! - Saran wrapped japanese jungle tree

Hi there guys, I know, I have posted quite the title. I've tried saran wrapping (or cling filming) once before and I have to say I really liked the results. So I decided to make it the background for a Japanese jungle tree. I know that's not an actual thing, I just have been wanting to do nail art of a Japanese tree since I saw a painting in Japan which was so nice but I couldn't take a picture (cause of a camera ban in that museum). I based this version off of memory and randomness.

 Ok so the saran wrap got eaten, but I wore the saran wrap look by itself for days and I really liked it. I like that if you feel one area is taken up too much with one colour, you can just keep dabbing until you feel it's right.
With this tree I did the leaves purposefully weirdly, they're oval shaped with some kind of support underneath with yellow spots. I don't know why but I felt like this tree would be in the jungle.
I liked the blue flowers, that was the colour of the flowers in the painting. But the flowers weren't as big in the painting and my flowers are big by accident, it just kind of happened. I was going to add more detail but I really like them the way they were so I left them. Which sometimes is the right decision :)

You know how the saran wrap is done. Saran wrap really does sound much fancier than cling film.
I started with the tree trunk which was all curly and cool but then I painted the leaves over and that masked all of that. The flowers did that even more. As you can imagine it was all toothpick. I know this section might seem redundant but sometimes I write the different toothpick techniques I use :P
Finally I fished for some glitter and randomly placed them around. You know I always need glitter but I felt the flowers needed some dotty friends(?), so the glitter came in.

Base: OPI - Japanese Rose Garden (Coincidence? I think not! But actually not cause I planned it)
Saran wrap colour: Max Factor - Cool Jade
Brown: w7 - Brownie
Green: Illamasqua - Nomad
Yellow: Topshop - Naked
Dark Green: OPI - Jade Is The New Black and China Glaze - I'm With The Lifeguard
Blue: M&S - Ultraviolet
Dark Blue: H&M - Blue My Mind
Sparkly Blue: Essie - Lots Of Lux
Teal glitter: Claire's - Dizzy


Thank you for reading and I hope you have a really lovely day!!! :)

Friday 29 August 2014

Yellow Nails: Topshop - Naked

Hello! I have a yellow polish to show and it's becoming one of my most used yellow polishes. You'll find out why as you read this post ;)
As I'm writing this I'm yet to go back to school, which is one of the single grimmest things that could happen :P As I'm entering 6th form it seems like everyone is really excited. Except me (and my bezzie), I don't get it, I love doing nothing!! Well it's inevitable and by the time you read this the 1st day will have happened; with the trying to find a good seat for the rest of the year(!) and finding out your classes and teachers. You know the drill. Seriously the summer is never long enough ahahahahahahahahaha (that was a long laugh).

Naked is a mustard yellow creme, simple as that. Mustard yellow isn't really a colour I'm fond of but weirdly I kind of like the colour of this. But not that much. Also I'm not sure if it suits me.

I recently mentioned how great Topshop polish is but if you missed that it's very good. I recommend you go to your local Topshop and take a look at the polish. There's a bunch of colours (some very unique, specially the glitter polishes) and it's very likely that the formula will be awesome. The names are generally pretty good. But Naked... Well that's debatable.

Ok THE FORMULA IS SO GREAT!! Come on how many 4 coat yellow polishes are there?? I have them and I just want a fuss free yellow and we have it right here. If you did 1 thick coat you could totally get away with it!! I used 2 thin coats but look at how opaque it is!! And how smooth and shiny it is!! It did apply like a dream, the formula is the perfect medium between thick and runny and so it's perfect to apply.

Thank you for reading and I hope you have a great day!! :)

Thursday 28 August 2014

The totally doable I have a life challenge! - Tribal splatter

Hello there my cool peeps!! I have some tribal nails today and not gonna lie I really love this design. So it happened that this design coincided with the 5K that I did (last Saturday) and I wanted to combine this theme with that. The 5K I did was called The Colour Run and from the title it's quite self-explanatory. It's a rather colourful run. I got a t-shirt for it and decided to use the colour scheme and concept for this tribal design.

So here is my creation. I did a kind of monochromatic tribal and put some paint splats over it. I love it; maybe it's the contrast with the black and white and the bright colours. I like the added silver, I think black by itself would've been very overwhelming to the design. Also paint splats look awesome, I've never done them before (or a proper splatter manicure, I should get to that). I was really unsure if this design was going to work (by 3rd nail I thought I had failed), but hallelujah it did!! The outlines of the splats actually really helped.

Now the easy to do this would be to paint the tribal then paint splat on top. But no I never take the easy way. I knew the colours would show up better on the white so I started with the paint splats. As usual it was a toothpick affair and I think the best method is to just be loose and free with the curvy lines. Then I did some little lines.
I made things hard for myself by adapting the tribal around the already existing splats (with the little extra dots). It was hard, and I was making up the tribal design on the fly based on generic tribal designs. I did like the tribal design I was ultimately able to come up with. It still looked a bit off. But yay for outlines!! They saved everything :)

White: No.7 - Snowflake and M&S - Light Mix (which added a nice delicate touch in some lightings)
Black: Lovely Me:Ex - Black
Silver: w7 - Silver Mirror
Green: China Glaze - I'm With The Lifeguard
Dark Green: Barry M - Kiwi
Yellow: American Apparel - Neon Yellow
Mustard: Topshop - Naked
Orange: Models Own - Beach Party
Darker Orange: Bourjois - Tangerine Fatal and Essie - Fear Or Desire
Pink: Nails Inc - Notting Hill Gate
Dark Pink: Barry M - Fuchsia
Teal: Barry M - Guava
Dark Teal: M&S - Peacock


That writing was originally black
Oo surprise bonus picture, of me!! :O Ok you can't really see me but I just wanted to show my nails with the t-shirt to show the colour scheme. This was me after the 5K, and I'm glad I did it even though I am extremely unfit because I hate exercise haha.
So the thing that happened during this run was that people threw coloured flour at you and this picture doesn't even describe how messy I looked!! You can only see a little bit of colour but my shower was thoroughly pink and purple (the only colours that really stuck) and that flour was seriously everywhere. You don't even want to know :P

Thank you so much for reading and I hope you have a wonderful day!! :D

Tuesday 26 August 2014

Black Nails: Topshop - Gypsy Night

Hey there guys!! I have a swatch today; this polish was actually one of the very first polishes I ever swatched. It actually wasn't too bad, but the cuticles were shameful and for that I apologise :P But this is legit a cool black polish. I'm not a black polish kind of girl (it's too gloomy) but these ones make me feel differently.

See already this isn't your typical black polish. Gypsy Night is a black polish with opalescent (red/orange/green) flakes and holographic glitter. Yeah, that's how you make black cool.

I really love Topshop polish, it's really really good stuff and I think totally underrated and under-appreciated. The colours are fab and the formulas are brill. I have said before I want to get more Topshop polish and I would but I guess generally my wishlist is very small nowadays (watch that change in 2 seconds) so I don't get anything. Yes I am a controlled lady.

I used 3 thin coats but as usual 2 thick coats would do you good. It applies very easily with no fuss. It builds very well as it may seem sheer but it's not really (really good descriptions from me as usual :/).

Thank you for reading and I hope you have a nice day!! :)

Monday 25 August 2014

The totally doable I have a life challenge! - Rose french tip

Hi there!! Another episode of the challenge here. Today was french tip; I feel like french tips get a lot of hate nowadays. But I don't think they're too bad. Whilst it's rare that I do a french tip; before I started blogging (this was a while ago) I used to do quite funky french tips. I was even going to throw it back to when I would do glitter gradient french tips and they were pretty cool.
I think french tips are disliked cause they're boring, but I brought it upon myself to do a cool, visually simulating french tip (how ridiculous do I sound right now?) for the prompt.

Hey I tried, and I really like it. It's quite delicate which is something I like about this manicure. I very much like the look of the bundled roses. It's a tried and tested design, it gave it a good chance to succeed. I also thought through my colour combinations of the roses, I chose the more neutral background for them to stand out.

I suck at roses, it's something that's very hit or miss for me. I think I just about hit here, but close to falling off the target. I used the method of blobbing 2 colours beside each other and getting a bobby pin to dab in the middle of the colours and paint 'c' shapes. it didn't work out very well here cause there was no definiton cause the roses are quite small. So after I got another toothpick to make the rose shapes form. And I just painted the leaves with toothpicks.

Yellow: Topshop - Naked
Pink and orange rose: No.7 - Me! Me! Me!, OPI - Where Did Suzi's Man-go?, Barry M - Fuchsia and Per Una - Fuchsia (no name)
Red and beige rose: Barry M - Carousel, Nails Inc - Sao Paulo Streets and M&S - Poppy
Purple and blue rose: Illamasqua - Jo'Mina, Barry M - Berry Ice Cream, OPI - My Current Crush and Essie - Lots Of Lux
Green leaves: Illamasqua - Nomad and Barry M - Kiwi


Thank you for reading and I hope you have a great day!! :)

Sunday 24 August 2014

Mushroom Nails: Nails Inc - Porchester Square

Hi there folks!! Don't be confused by the title, unfortunately this ain't a nail art post. It's a little swatch of Nails Inc Porchester Square. Took me a while to get this swatched, I got this Christmas '12. I want to first apologise for my swatches, Porchester Square is a great polish but I used the mother of all bad topcoats and the bubbles were horrendous. I cannot even deal with that topcoat it's so bad T.T So I'm sorry for the bubbles, it's not Porchester Square's fault!!

Honestly I struggled to get this colour accurate, it's a darkish mushroom creme with pink tones. It's slightly darker in real life than in the pictures, and yeah more pink toned but not too much more. Porchester Square is one of my favourite neutral polishes, it's just a nice colour.

I do like a nice Nails Inc polish; but full sizes are steep. Now they have to very special Nails Incs (or free ones in a magazine!!). I tend to just get the minis in TK Maxx cause that's just the best way to get Nails Incs (I do not know the plural for this brand).

The formula is very great, it's so opaque it's ridiculous. I used 2 coats as my nails are a bit longer but it's so opaque that if I got a thicker coat I could've done 1 coat. It's easy to apply but it's a thicker kind of formula that is more viscous.

Thank you for reading and I hope you have a nice day!! :) 

Saturday 23 August 2014

The totally doable I have a life challenge! - Pineapple pattern

Hey there guys, I hope you're doing really well. So continuing with mentioning my results, I think I did quite good, ok I'm just gonna say it. I got all A*'s and A's. It's nice knowing all the work didn't go to waste :)
So the prompt for today's design was Pineapples which I realise I have never done before, how crazy!! But yeah I went from there and I really like today's manicure.

Are we surprised? I did another cute food manicure. Will I ever get tired of these? I think not. Honestly when I first saw the prompt I didn't know what to do but remember, this is me. Quickly I went straight to the cute food thing.
I wanted to do this like a pattern with some bright colours cause once again if you know me you know I like bright colours. I think the pineapples are pretty cute and I decided to add some rings (in ode to pineapple rings) for extra colour and fun factor(?) and I really like them!!

I started the pineapples with a toothpick then got lazy and switched to the polish brush. I did those quick artsy strokes for the pineapple tops and just toothpicked the rings. Then did some glitter placement with, guess what, a toothpick.

Teal: Barry M - Guava, Barry M - Aqua Glitter and OPI - Last Friday Night
Peach: Claire's - Hundreds & Thousands
Yellow: Topshop - Naked, Rimmel - Sunshine and M&S - Maize
Green: OPI - Jade Is The New Black, Illamasqua - Nomad and China Glaze - I'm With The Lifeguard
Black: Lovely Me:Ex - Black
White: Barry M - Matt White
Purple and glitter: Illamasqua - Jo'Mina and Orly - Ridiculously Regal
Pink and glitter: Barry M - Fuchsia and OPI - Minnie Style
Orange and glitter: Essie - Fear Or Desire and Barry M - Superdrug Xmas LE 2012 B
Blue and glitter: Essie - Bikini So Teeny, Topshop - Razzmatazz and Hare Polish - The Teen Queen


Thank you so much for reading; I hope you have a brilliant day!! :)

Friday 22 August 2014

Gimme Glitter: Etude House - Play #130

Hi there guys!! It feels good to write a Gimme Glitter, it feels like a long time for me. And it's nice especially after my results, which I'm very happy with by the way :)
This is the final of my trio of Etude House polishes. I think the mix of glitter is very interesting here, also there does seem to be every colour of glitter in this polish. But arranged in a nice way.

So Play #130 is a white creme base with *takes deep breath* very small green glitter, white, orange and purple small hexes, bigger white hexes, small gold and pink squares, big pink squares and big matte coral and green hexes. The mix reminds me of a garden and general whimsy, it's really cute!!

I once again appraise the name, well I care more for awesome polish than awesome names. But why not have both? I think Korean brands really know how to make their interesting polishes that could rival any indie brand. I'm glad I can get access to cool polishes like this.

The glitter spread very very well and I didn't need to fish for anything. The coverage was also very good, I think 2 thick coats are enough but I used 3. But the formula was thick or clumpy at all like you might think for a glitter polish like this.

Thank you for reading and I hope you have a really nice day!! :)

Wednesday 20 August 2014

The totally doable I have a life challenge! - Tropical beach

Hey there my cool dudes!! I guess I'm just gonna take my time posting this challenge, but hopefully I'll get most of it up this month. I hope you're having a really nice time right now. Tomorrow is a kind of scary day as I'm getting my results to the exams I did. Haven't really been thinking about it but hopefully it will be ok?
Anyway today's prompt was tropical and of course you know what else goes together like tropical and beaches? Nothing, that's what.

I decided I wanted to challenge myself instead of doing something I do all the time. I want to push myself ya'know. So I decided to paint a nice beach scene, with artsy elements? I tried to do fancy sand and fancy water and I really happy with how it turned out. I think the palm trees look cool and you know I like that starfish.
I wanted a sunset sky, which I was wary of but I think in the end in worked out. Honestly I was a bit wary of the whole design but yay it worked!

So the gradient was done with a sponge, I had some yellow too but that got covered up by the sea. After the base I did the sand where I did lots of little strokes and dots with my toothpicks. For the sea and the leaves of the palm trees I used a similar method by doing lots of fast strokes of the toothpick.
For other beachy elements I just got the toothpicks and painted them. I changed my mind for he colours of many things; the heart of the towel was changed too many times.
Also fun fact, I originally had a bucket on my index finger but it was such a fail that I scraped it off (professional me) and just painted the sea and sand over again. It was a good move though, that bucket was a mess.

Base: OPI - Charged Up Cherry, Etude House - Play #60, OPI - Where Did Suzi's Man-go? and Topshop - Naked and M&S - Maize hidden under the sea
Sand: w7 - Linen, M&S - Sun Glow, Ciate - Cookies & Cream (I think) and M&S - Golden Sands
Sea: H&M - Blue My Mind, M&S - Ultraviolet and Barry M - Blue
Foam of the sea: Barry M - Matt White and No.7 - Snowflake
Brown: w7 - Brownie
Palm tree trunk: Nails Inc - Porchester Square, M&S - Champagne and Paris Collection - Mauve Melody
Palm tree leaves: OPI - Jade Is The New Black, Rimmel - Cool Jade and Barry M - Kiwi
Black: Lovely Me:Ex - Black
Purple shell: Barry M - Berry Ice Cream and Illamasqua - Jo'Mina
Starfish: Barry M - Carousel
Towel and hearts: Barry M - Guava and the hearts are Barry M - Fuchsia and Orly - Basket Case (just to name a few)
Umbrella: American Apparel - Neon Yellow, Models Own - Beach Party, OPI - Minnie Style for the parasol part and the stand is Lovely Me:Ex - Black and w7 - Silver Mirror
Flip Flops: Essie - Fear Or Desire, Rimmel - It's A Scorcher! and Illamasqua - Nomad

Thank you very much for reading and I hope you have a real nice day!! :P :)

Tuesday 19 August 2014

Green Nails: Etude House - Play #86

Hello there!! Now I did this swatch a while ago so I'm going to try very hard to remember everything about it. This is another lil' Etude House polish I decided to get; I was picking randomly from the stand cause a bunch of the colours looked pretty damn fabulous. I love some green polish and it's about time I got me a pistachio shade ;)

#86 is a rather light pistachio  yellow-toned green creme, it's more subdued in real life (this 1st picture is the most colour accurate) but still really pretty. It's a great wee colour. A wonderful addition to my collection, I don't have a single yellow-toned green.

#86 is a really great name. There seemed to be a lot of kind of similar colours but again they were really nice shades. I think Etude House has picked their cremes well and the pricing is really good!!

The formula was really nice, it glided on perfectly and opaquely in 2 coats. I found the issues came after when I got bed sheet marks on my nails when I painted my nails around 5pm. So beware of that but perhaps that was just the environment I was in.

Thank you for reading and I hope you have a wonderful day!! :)

Sunday 17 August 2014

The totally doable I have a life challenge! - Gladiolus flowers

Hey there my wonderful nail people!! Man it's been a while, at least for me anyway. I haven't had a post break in a long while (due to the backlog) but I ran out of posts and I decided to take a week off. As it turned out I actually had a life last week and didn't have time to post. In fact I had this design done on the 8th (the day it was meant to be up for the challenge) but I felt no pressure in getting it up. After all I'm meant to have a life.
But I will be catching up on all the days of the challenge cause come on myself, it's been ages since I've done a challenge (31 Day Challenge anyone?) and I really like the prompts for this one. It's manageable and very summer-y (which is pretty much the opposite of the weather I've been having at home so I like having summer on my nails). Californails set up this challenge and I saw Lucy from The Nail Snail and Kelsie's Nail Files participating and I thought it sounded like some fun :)

Unfortunately I'm starting this off with a stinker, I hadn't heard of Gladiolus flowers before how majestic is the name? But they were really pretty flowers. But I found a way to mess them up haha; I do prefer the flowers in pictures as opposed to real life. I am hoping to do something similar soon just to prove to myself that I can do flower nails haha.
I was going for a "marbled" petal kind of look and that didn't really work. The colours don't do it for me and I thought glitter could save this cause glitter can save everything. But not this apparently. I like my thumbnail but that's about it.

I used the brush of the nail polish for the petals and then I used my toothpicks for the edge of the flowers. I did abstract strokes of the toothpick for the "marbled" thing. Yeah you know me, I'm a toothpick girl and the details were also painted with them.

Base: Nails Inc - Porchester Square
Glitter: L'Oreal Color Riche - Confetti
Purple: Illamasqua - Jo'Mina
Blue: H&M - Blue My Mind
Lighter Blue: Essie - Bikini So Teeny
Teal: Barry M - Guava
Dark Pink: Madame Milly - Pink (no name)
Coral: Etude House - Play 60
Green: Barry M - Kiwi
Dark Green: Rimmel - Block Your Green!
Black: Lovely Me:Ex - Black
Pink: Orly - Basket Case
Red: Essie - E-nuff Is E-nuff
Dark Purple: OPI - Plum & Get It
Light Purple: Essie - Lilacism
Orange: Essie - Fear Or Desire and OPI - Where Did Suzi's Man-go?
Pistachio Green: Etude House - Play 86
Light Green: Rimmel - Misty Jade
As you can tell I also thought that adding ALL THE COLOURS would help things, but it didn't.

Thank you for reading and I hope you have a great day, I will be posting previous and future prompts of the challenge over the next while!!! :)

Saturday 9 August 2014

Facebook Sticker Series: Napoli the Ice Cream

Hello you fine people!! I have another installment of Facebook Sticker, it took me less than a month to get this one out, personally I'm proud. It usually takes me a long time to get my series out so good job me haha. I have Napoli today who's a really cute ice cream. This has me written all over, cute food!!

Sorry it's a bit messy today but I really like it, especially index finger with the HUGE eyes, I'm all about that. But Napoli does various cute poses with cute things, I have Napoli listening to music, being really cute, holding a heart and a flower here. I would've done something for my pinky but the surface area is small hahaha.

I did a glitter gradient on all my nails but yeah you can't see that, hey that's one good thing about one less Napoli.
I started with my white base and then went the with the Napoleon ice cream order, strawberry, vanilla, chocolate with the toothpicks and brushes. I added different details with my toothpick and pen.

Base with glitter: Etude House - Play #60 and Nails Inc - Regents Park
Pink: Barry M - Dragon Fruit
Peach: M&S - Sun Glow
Brown: w7 - Brownie
Black: Lovely Me:Ex - Black
White: Barry M - Matt White and Lovely Me:Ex - White
Light Brown: Nails Inc - Porchester Square
Red: Essie - E-Nuff Is E-Nuff
Orange: Rimmel - It's A Scorcher!
Green: Barry M - Kiwi

Thank you for reading and I hope you have a really nice day!!! :)

Wednesday 6 August 2014

Gimme Glitter: The Face Shop - Apple Mint Yogurt

Hey guys, I told you another yogurt polish was coming up and here it is. A couple of days ago I showed Strawberry Milk Yogurt (which is incredible) and today I have Apple Mint Yogurt which is another super pretty yogurt polish. At the shop I once again toyed with getting the purple one but convinced myself the pink and blue ones were better. Though honestly I'll probably get the purple one in due course :P

Apple Mint is a pale blue base (with hints of green) with blue, pale pink and fuchsia hexes with small pale pink and silver glitter. Again very very pretty and serene polish. It's a lovely if not groundbreaking blend, but I just love the fuchsia glitter in here, I wish there were more!!

2 more yogurt polishes and I have them all haha, but I'll probably get them next year. I've been eyeing the purple one for a while and you know I might as well get the yellow one to complete the set haha. Once again The Face Shop has just done a brilliant job with these.

Apple Mint Yogurt is a bit more sheer than the other polishes, I had to do 4 thin coats to remove all streakiness but it covered well and the formula was gliding. It's less glitter dense than the other 2 I've tried but I think that's what Apple Mint was going for. More subtle glitter.

Thank you for reading and I hope you have a great day!!!! :)

Monday 4 August 2014

Abstract Bird Nail Art

Hiya!! I decided to branch out a bit and do some more abstract nail art. I felt like birds so that's what I went with. Now the success rate is varied haha.

I really like the colours, and I'm really happy with the birds on my thumb and pinky but otherwise it's very messy for the birds. I should've used a thinner toothpick, but at least the abstract thing is more obvious. I also like the branches with the multi-coloured leaves, I quite like this design even though the messiness is real.

I just tried to be a bit crazier with my toothpicks and didn't have a set outline. The other standard me thing is the white sparkle which got blurred on my ring finger. I would do blobs of the colour then get the dark blue to do a rough crazy outline. I went mental with the few "spots" I did.

Base: The Face Shop - Apple Mint Yogurt
Green: Etude House - Play #86
Blue: H&M - Blue My Mind
Pink: Etude House - Play #60
Teal: Barry M - Guava
Dark Blue: Kiko - 265
White: Barry M - Matt White
Brown: Nails Inc - Porchester Square

Thank you for reading and I hope you have a lovely day!!! :)

Saturday 2 August 2014

Coral Nails: Etude House - Play #60

Hello there!! You know I love going to Etude House to get some sweet polish. I got #60 here thinking it was pink, the kind of pink that I'm obsessed with. But once I wore it, it was very different on the nail than in the bottle. Now I love the colour in the pictures but it's not completely accurate cause colour correcting is difficult. Anyway we'll talk more later ;)

I've settled that this polish is coral, though if I'd known that from the beginning I would've loved it more cause the colour is wonderful. I feel like it was false advertising :P I'm quite liberal calling things neon, but see for yourself it is pretty bright.
#60 is a orange-y pink-y (depending on lighting) coral that's pretty neon. It is a fantastic colour, I <3 orange polish!! But it's slightly less orange in real life, hopefully the next time I used this polish I can capture the colour more accurately (I used it in nail art and the colour was way more pink :/).

#60 is a great name, one thing Etude House didn't change with the redesign was the poorly thought of names. Lacqueerisa told me prior to going to Etude House that the bottles were different (read: less cute) and I totally and utterly agree with her. The old lid was pink and decadent but now the bottle is just round with a white lid and printed lace design. But the good thing about the white lid is that you can see the colour very well. I got a couple more Etude House polishes that I'll show you over the next couple of weeks and I'm excited cause they're really nice.

Formula = awesome, it's a super shiny neon which is rare. It's because the polish is jelly, but unlike every other jelly it didn't give me a billion bubbles. I used thickish coats! Also the formula is very opaque, I thought I could do with 2 coats but there was a bit of VNL so I added another. But it was super smooth and easy to apply :)

Thank you for reading and I hope you have a nice day!! :)